|


How To Make Money with Amazon Native Shopping Ads by Harsh Agrawal
Have
you been considering to replace AdSense with something which pays you
more? Are you tired of low paying advertisement & earning less from
your blog?
Well,
today I got something interesting which can make a lot of money for
you. Especially if you have a niche blog & traffic from U.S.A, this
new ad monetization network can do wonders for you. Amazon is always a
popular choice among publisher for their Affiliate program & in
recent time, they have launched many new ad types which you can use to
monetize your blog. One of them is Amazon native shopping ads which you
can show at the end of the article & start earning money from
Amazon.
In
this guide, I will share everything you need to know about getting
started with Amazon native shopping ads. I would suggest you to try this
ad type for two weeks upto a month & see how it's working out for
you.
What is Amazon native shopping ads & how it works?
Amazon native shopping ads are similar to AdSense in terms of showing contextual ads.
It
shows relevant ads based on the page where ads are being displayed.
Once you place the ad codes on your blog (You just need to do it once),
it automatically scans the content of the page & display products
based on the keywords used within the article.

Unlike
AdSense, here you will be earning money for actual sales. Do remember,
Amazon also pays for other product purchased by your referred users. To
make it easy for you to understand, let's take this example:
Let's
say you have a visitor whose name is Pauk. Paul clicks on one of the
ads (By Amazon native shopping ads) on your blog & goes to Amazon
site. If he purchases the product which is worth $100, you will be
getting a commission of 4%. In some cases, you will also be getting the
commission up to 8%. (Depending upon the volume).
4% of $100: $4
This
is a usual scenario. Now, if Paul decides not to purchase the product
recommended by you but purchased 10 different products worth $1000, you
will still be earning 4% of his total purchase.
4% of $1000: $40
In
short, you are earning $40 from one referrals. In case, if you don't
know, Amazon is the top e-commerce site in the world & their
conversion is really great in comparison to most of the other sites.
In short:
[Tweet "Amazon native shopping ads is the #AdSense on steroids!"]
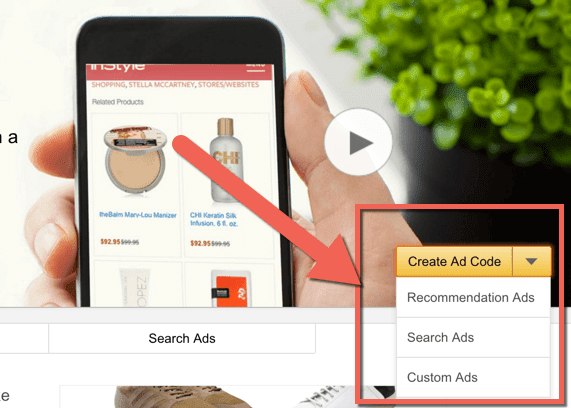
At the time of writing, there are three variants of Amazon native ads:
- Recommendation Ads: Allows Amazon to automatically recommend the best-matched products based on your webpage content and your visitors.
- Search Ads: Allows you to drive recommendations based on a search phrase determined by you or your visitor.
- Custom Ads: Allows you to specify the products from Amazon.com that you wants to promote.
Ads
are responsive, so it would work with all screen sizes. One limitation
is, Native products ads is available for only Amazon U.S. program, so
you might want to use a geo-targeted ad server such as DPF to serve ads.
(If you know of other solutions to show ads based on users geographic
location, do let us know in the comment section).
Before you move ahead, you might want to spend 5 minutes reading FAQ about this new monetization offering from Amazon.
- Read: How to promote affiliate products on your blog?
Getting started with Amazon Native shopping ads:
In this section you will learn:
- How to create ad codes for native shopping adsTricks to make your ad more relevant.
- Tricks to make your ad more relevant.
- Implementing ad codes on your WordPress or any other website
If you have an existing Amazon affiliate account, you can get started right away. If not, you can apply for you.
Head over to this page & click on create ad code. You can select from three ad types & for this tutorial I have selected recommendation ads:
On
the next page, you have to option to select categories from which you
want the products to be displayed. This is an important step as if you
show products relevant to your website content; you are more likely to
earn more.

As
you can see in above image, I have selected the categories which are
relevant to my blog (Technology blog). Once you have done this, scroll
down & configure rest of the options which are straight forward too.

Once
this is done, all you need to do is place the ad codes on your blog. If
you are using WordPress, you can use this plugin call Ad inserter.
This is a free plugin & using it; you can place ads anywhere in
your blog. Here is how I have used this plugin to place Amazon ads after
content:

Another plugin that you can use is Ad injection WordPress plugin. When I placed the ad codes on my tech blog (ShoutMeTech), it started displaying ads instantly.

Note:
If you are going to place Amazon display ads on the different website
of yours, I suggest create tracking ID for all your blogs. This is going
to be pretty useful to measure the performance of every blog.
Amazon Display ads landing page
Are
you using Amazon native display ads on your website? How's it working
out for you? Do share your review & feedback with us in the comment
section below. Here are more articles you should check out to earn money
from your blog:
- Best recurring affiliate programs: Earn money for life
- Four proven ways to make money in 2016 & beyond
- Affiliate marketing or AdSense: Which one makes more money?
 |
You can use AdSense And Affiliate links on Same page?
Here at ShoutMeLoud I talk about Google AdSense and Affiliate marketing all the time, and keep getting questions related to the same. One of the most asked question is,
Can I use AdSense and affiliate ads on the same page. Will it be violation of AdSense policies?
This
is the most common question by newbie bloggers who just started
monetizing their website with Affiliate ads and have AdSense running on
their blog. AdSense is a contextual ad
network and they do not allow running any other ad network which mimic
ads like AdSense.
Can you have Amazon Affiliate And Adsense on same Page:
Let me take example of Amazon affiliate ads,
as they are one of the popular affiliate program. You can replace it by
anything like eBay, hosting affiliate or other affiliate programs you
can think of.
Answer is "Yes" you can place Affiliate ads along with AdSense ads on the same page, and this doesn't
violate AdSense policies. Here is a screenshot from official AdSense help page, which clearly says: "We do allow affiliate or limited-text links."
To
add more to it, here is what you need to know to use any other ad
network with AdSense. In simple words, Affiliate ad is also considered
as different ad network here:
Before
you jump with joy and start adding tons of affiliate banner ads and
link ads on your blog, here are few important things which you should
know.
- If number of ads or affiliate banner/links is more than the original content, this will put your AdSense account in danger. So limit the number of ads on your blog, and focus on adding value and quality of your website. I suggest you to keep an optimum limit of Ads on your blog, and place it in a way which doesn't hamper user-experience on your website.
- Your affiliate ads should not link to content which are not allowed in AdSense policies. Ex: Adult content. AdSense treats other ads (Ads from other ad network or affiliate ads ) on a page as part of the content, and it should follow their content guidelines.
- While using Affiliate links on your blog, make sure they are nofollow. This has nothing to do with AdSense, but using Nofollow tag is a good practice from SEO point of view. You can use this guide to learn how to add nofollow tag or better use Gocodes WordPress plugin.
Summing it up:
To
sum it up; you can use
Affiliate ads with Google AdSense on your blog. Though before you jump
into the world of affiliate marketing, I suggest you to learn tricks of
the trade and then implement ads. A good idea is to replace one of your
low performing ad unit with direct affiliate ads of a product related to
your niche. Once you start getting success in form of affiliate sales,
replace more AdSense ad blocks with affiliate ads. If you select the
right product to promote, you can easily earn minimum 2-3X of your
AdSense earning via Affiliate marketing.
Here I have hand-picked few posts which will help you to get started with Affiliate marketing:
- What is affiliate marketing and FAQ?
- How to promote affiliate products on your blog
- The beginners guide to start with Webhosting Affiliate program
- How to select best affiliate program for your blog
- How Google treats affiliate links from SEO perspective
If you have any more question related to using Affiliate ads and AdSense
together, feel free to ask via comments. If you find this post useful, do share it with your friends on Google and Facebook.
Watch out for next blogging tip!
by Harsh
Free Tag Assistant Chrome Addon: Verifies Google Tags Installation by Harsh Agrawal
Are you using Google analytics or Google tag manager or
Adwords remarketing or all of them on your blog/Website? Even if you
are not using all these yet, I highly recommend you to start using it.
It was 2 years back when I started using Google tag manager to manage
all the tags for every blog in my blog network.

Today,
I was implementing Google Adwords remarketing tags & needed a way
to verify if I have implemented all the tags correctly or not. This is
when Adwords help page redirected me to Tag assistant chrome addon which I believe is useful for all digital marketers & bloggers.
This is a nifty chrome addon which would help you with following:
- Troubleshoot installation of Google Analytics.
- Troubleshoot installation of Google tag manager.
- Verify installation of various Google tags on your website or any other webpage on web.
- Shows which all tags are present on a webpage
- Shows any error & cause of the error ( very useful for debugging)

Here is a video that shows how this chrome addon works & I suggest you to watch it before you install this chrome addon.
You can download the tag assistant Chrome addon from here.
Along with this, if you have not implemented Google tag manager on your
blog, you should do that too. Instead of using a separate plugin or
manually adding Google analytics, Facebook remarketing tags on your
blog, you should rather use Google tag manager to manage all of it from
one place. I have written a complete guide along with recommended free
WordPress plugins to help you get started with this:
- The Beginners guide to configure Google tag manager (With screenshots)
Once
you are done configuring Google tag manager {GTM} that usually takes
about 5 minutes, you should check out the below video to learn about
adding Facebook remarketing pixel on your website using GTM. If it's new
thing for you, don't worry as this video is created for anyone with
basic or intermediate skills.
Tasks to perform today:
- Configure Google tag manager for your blog/website
- Configure Google Analytics using Google tag manager
- Create Facebook pixel & add pixel code on your blog using Google tag manager
I
know today you have few more tasks than usual, but once you start doing
it, you would realize it's so easy to do. None the less, adding
Facebook pixel today will help you to level up your digital marketing
game in coming days. If you are using Chrome browser, here are few more
add-ons which you would love to try out:
- 5 best Chrome SEO extensions
- SEP experts sharing their secret browser SEO addon

3 Days with Amazon Affiliate (Income Report)
Hey guys, I have always thought that Affiliate marketing is a bunch of BS and you have to be a mastermind in order to really earn from it.
Unfortunately, I was wrong. I recently got into Amazon Affiliate program where I promote technology products. It has been 3 days to be exact with you. And I was really surprised by the amount of money I've earned from it.

What do you guys think about my income report? Is this is good start for a beginner like me? Any feedback would be appreciated.
Exclusive AdSense Site Blueprint That You can Use
Internet is full of opportunities to make money,
and blogging is one of the smartest and ethical way, to earn money. One
big misconception about blogging is, you need to work day and night to
make money. It's true when you want to create a name along with money,
but if your goal is to earn money in shortest time and long-gain, then there are many shortcuts out there. For an example, a micro-niche blog.
In this newsletter I will share an example of a micro-niche blog that is making $174 from AdSense/month for me and $100 on an average from Affiliate marketing with few hours of work.
This is a blueprint for creating such micro-niche blog,
and you can use it for any topic/niche you like. In my case, I didn't
use any content agency, so I picked up a niche that I enjoy reading and
writing about. So, instead of sharing a general post, I'm sharing the
actual steps I followed to create one such blog, and after 40-50 hours
of total
work, this blog has made over $2000 for me in last one year.
Why start a micro-niche Blog?
First of all after so many algorithmic changes from Google, a niche website ranks higher in search engine.
If you create a high-quality website on any particular topic, your
chances of ranking higher is stronger than any existing authority
website out there. Also, you don't have to work day and
night on that blog, as once you have worked hard to create an evergreen
niche blog, all you need to wait and see money-getting deposited into
your account.
This
is the blueprint of a micro-niche blog that I created. Do remember,
this is the exact method I followed for my blog, and you can follow this
to create one for yourself right
away.
The Complete BluePrint to Build a Niche Website which makes money:

Select Niche and Domain:
The most important thing that you need to do is find a niche that
you are most comfortable with. Make sure to think of commercial and
popularity aspect of it. Since our target is to make money from it
using AdSense, you should pick a topic that is popular in countries like U.S. and U.K., and have commercial value
(High CPC).
In
my case, I picked a topic call "Cydia" that is a jailbroken tool for
iOS device, and very popular among iPhone users. I chose this topic, as I
was very comfortable with it and expiration time on this topic was
quite high, and it has good searched in Google. For quick research, I
used LongTailPro Keyword research tool.
For domain, I settled with Cydiaguide.com
Keyword research and content planning:
For content planning, I was clear about few things:
- Pick those topics that will last for long.
- Make this micro-niche site like a Wikipedia for the topic you are targeting.
- Pick the keywords that are driving traffic or CPC.
So instead of being particular about picking only high AdSense CPC keywords, I created a mindmap of content. Which was more like a FAQ of that topic. For example:
- What is [topic]
- How to use/install [Topic]
- Advantages and disadvantages of using [topic]
- Important Facts about [topic]

This
way by the end, I had at least 20+ topic ideas for a micro-niche
website. Next few hours I spent writing 4-5 blog posts, and one post
daily for next couple of days. This way my content part was done, and I
had 15 high-quality evergreen (2-3 year expiration) content.
Setting up the Micro niche blog:
Now, the rest part was very easy, as if you know how to create a blog on WordPress,
you don't have to worry about much. Your content will do the rest of
the magic. Here are exact tools I used to create and setup my blog. This
checklist includes plugin, theme and
other important details that you need to create your micro-niche blog.
- Hosting: Bluehost with one free domain (Only $3.95/month) ( Check this tutorial to learn how to install WordPress on Bluehost)
- Theme: SwiftThemes (Plug and play)
- WordPress plugins:
- WordPress SEO by Yoast for site SEO.
- EasyWPSEO for Keyword optimization. (Learn how to use EasyWPSEO plugin)
- WPSocial for social media optimization
- Akismet for preventing comment spam.
- Auto post thumbnail for automatic generation of the featured image.
- Digg digg for Social Bookmarking icons
- Google XML sitemaps for creating sitemap.
- Insights for helping me in inter-linking while writing post.
- Jetpack by WordPress for multiple purposes including stats in Dashboard.
- No Self pings to stop self-pinging
- PushPress for faster indexing.
- SEO friendly images for image level SEO.
- Subscribe to comments plugin.
- WP Smush.it for image compression.
- WP Super cache for Caching.
- Wptouch for mobile friendly WordPress blog.
Additional steps that I followed:
- Made my blog on site SEO perfect.
- Took extreme care of content quality and Keyword score.
- Made few videos on Youtube and linked to my blog from description. This generated traffic and also earned decent quality themes.
- Submitted sitemap to major search engine.
- Submitted my blog to top 100 sites using IMT submitter.
- Created a logo using free online logo maker.
The
whole idea with
this blog was to work less, and make it ready for earning. So I didn't
invest much time on branding, as the goal was to drive search engine
traffic, solve the purpose and make money from the niche blog. Here is
the traffic report of this blog from starting:

Do
remember, this blog have only 26 blog posts, and it's not updated from
month. At this stage, I have to start preparing few more content to push
the traffic again.
Few things that I should have done: (Things that you should do)
Created separate Social media page: Social media profiles are
helpful in many ways, but in this case I skipped doing it. Reason
being, I didn't want to create a new social media property. But, it's
always good to add Social media profile and use social-media automation.
I use tools like Bufferapp and hootsuite to share
content from this blog on Google plus, Facebook pages.
No back link building and no promotion:
I have not built even a single backlink, and no promotion apart from bit of social-media
promotion. All traffic is organic, and purely due to quality of content. I have worked most on On site and on Page SEO.
Monetization:
For initial couple of months I used only AdSense, and later added one affiliate product related to iPhone niche, which generated extra income of $100/month on an average.
Over all if you consider all the aspects in nutshell:
With $60 investment and 40 hours of work I have made over $2200 till now,
and blog is still making money. Moreover, I don't need to spend time on
backlinks and other promotional stuff which takes time. The whole
idea is to set few more niche blog like this, and create different
sources for online income. An eBook explaining step by step guide will
be on sale from next month, for now this micro-niche blueprint is good
enough for any experienced blogger to start a money making site with few
hours of work.
Cholil If you have any question
regarding this Blueprint, feel free to ask me by replying.
Have a great time & see you in next email.
Sourse by Harsh
Subscribe to:
Posts (Atom)