Have
you been considering to replace AdSense with something which pays you
more? Are you tired of low paying advertisement & earning less from
your blog?
Well,
today I got something interesting which can make a lot of money for
you. Especially if you have a niche blog & traffic from U.S.A, this
new ad monetization network can do wonders for you. Amazon is always a
popular choice among publisher for their Affiliate program & in
recent time, they have launched many new ad types which you can use to
monetize your blog. One of them is Amazon native shopping ads which you
can show at the end of the article & start earning money from
Amazon.
In
this guide, I will share everything you need to know about getting
started with Amazon native shopping ads. I would suggest you to try this
ad type for two weeks upto a month & see how it's working out for
you.
What is Amazon native shopping ads & how it works?
Amazon native shopping ads are similar to AdSense in terms of showing contextual ads.
It
shows relevant ads based on the page where ads are being displayed.
Once you place the ad codes on your blog (You just need to do it once),
it automatically scans the content of the page & display products
based on the keywords used within the article.
Unlike
AdSense, here you will be earning money for actual sales. Do remember,
Amazon also pays for other product purchased by your referred users. To
make it easy for you to understand, let's take this example:
Let's
say you have a visitor whose name is Pauk. Paul clicks on one of the
ads (By Amazon native shopping ads) on your blog & goes to Amazon
site. If he purchases the product which is worth $100, you will be
getting a commission of 4%. In some cases, you will also be getting the
commission up to 8%. (Depending upon the volume).
4% of $100: $4
This
is a usual scenario. Now, if Paul decides not to purchase the product
recommended by you but purchased 10 different products worth $1000, you
will still be earning 4% of his total purchase.
4% of $1000: $40
In
short, you are earning $40 from one referrals. In case, if you don't
know, Amazon is the top e-commerce site in the world & their
conversion is really great in comparison to most of the other sites.
In short:
[Tweet "Amazon native shopping ads is the #AdSense on steroids!"]
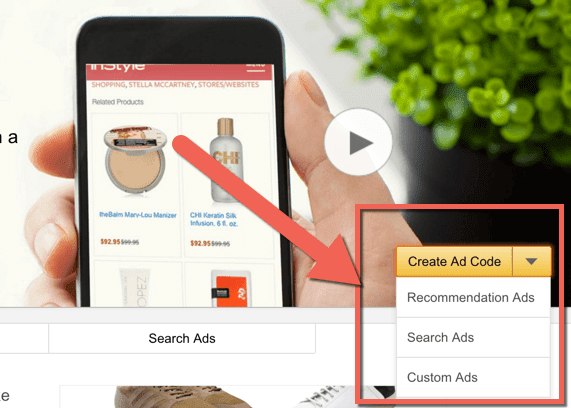
At the time of writing, there are three variants of Amazon native ads:
- Recommendation Ads: Allows Amazon to automatically recommend the best-matched products based on your webpage content and your visitors.
- Search Ads: Allows you to drive recommendations based on a search phrase determined by you or your visitor.
- Custom Ads: Allows you to specify the products from Amazon.com that you wants to promote.
Ads
are responsive, so it would work with all screen sizes. One limitation
is, Native products ads is available for only Amazon U.S. program, so
you might want to use a geo-targeted ad server such as DPF to serve ads.
(If you know of other solutions to show ads based on users geographic
location, do let us know in the comment section).
Before you move ahead, you might want to spend 5 minutes reading FAQ about this new monetization offering from Amazon.
- Read: How to promote affiliate products on your blog?
Getting started with Amazon Native shopping ads:
In this section you will learn:
- How to create ad codes for native shopping adsTricks to make your ad more relevant.
- Tricks to make your ad more relevant.
- Implementing ad codes on your WordPress or any other website
If you have an existing Amazon affiliate account, you can get started right away. If not, you can apply for you.
Head over to this page & click on create ad code. You can select from three ad types & for this tutorial I have selected recommendation ads:
On
the next page, you have to option to select categories from which you
want the products to be displayed. This is an important step as if you
show products relevant to your website content; you are more likely to
earn more.
As
you can see in above image, I have selected the categories which are
relevant to my blog (Technology blog). Once you have done this, scroll
down & configure rest of the options which are straight forward too.
Once
this is done, all you need to do is place the ad codes on your blog. If
you are using WordPress, you can use this plugin call
Ad inserter.
This is a free plugin & using it; you can place ads anywhere in
your blog. Here is how I have used this plugin to place Amazon ads after
content:
Another plugin that you can use is Ad injection WordPress plugin. When I placed the ad codes on my tech blog (ShoutMeTech), it started displaying ads instantly.
Note:
If you are going to place Amazon display ads on the different website
of yours, I suggest create tracking ID for all your blogs. This is going
to be pretty useful to measure the performance of every blog.
Amazon Display ads landing page
Are
you using Amazon native display ads on your website? How's it working
out for you? Do share your review & feedback with us in the comment
section below. Here are more articles you should check out to earn money
from your blog:
- Best recurring affiliate programs: Earn money for life
- Four proven ways to make money in 2016 & beyond
- Affiliate marketing or AdSense: Which one makes more money?